Focus On: HelpNDoc (part 3)
This is the third in a series of blog posts about my experience of using HelpNDoc in a real life project to produce documentation for my Unit2NS program.
Please note that there have been a couple of updates to HelpNDoc since I started this series, but I have stayed with v7.7.0.519 throughout for consistency.
In part one I covered:
- An introduction to HelpNDoc
- Starting a new project
- Adding content, including:
- Adding & editing topics
- Formatting text & using styles
- Creating hyperlinks
- Inserting images
- Using variables
- Generating help documentation
And in part two I discussed:
- Customising document output using HelpNDoc scripts
- Conditionally including content depending on the type of document
- Source code generation
- Keywords
- Inhibiting the Copyright message in help topics
- Using custom build tags
- Customising document output.
- Various topic properties not covered to date
The first three subjects will be discussed in this post, with the final three being held over for part four.
Source code generation
Many programs will have a context sensitive help system where, for example, requesting help from a dialogue box will display a page of help that provides specific information about how to use that dialogue box.
As an aside, it's sad to see this practise becoming less common, where requests for help often just dump you on the home page of whatever documentation exists and leave to search for the relevant topic. A retrograde step in my opinion.
As you can imagine from that little rant I wanted to give Unit2NS some context sensitive help for each of its main dialogue boxes. To do that the program needs some means of identifying specific topics within the help documentation. HelpNDoc assists with that by generating source code, in a choice of programming languages, that identifies each of the topics within the help project.
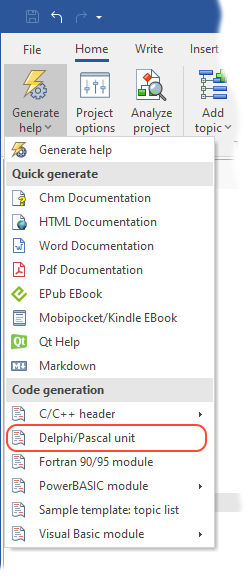
I'm going to use this code generation feature to generate some Pascal code, but the information about how to do it applies equally well to other languages. This is very straightforward. Go to the Home ribbon and drop down the menu from our old friend, the Generate help button. In the Code generation section of the menu select the language you require: in this case we want Delphi/Pascal unit:
The now-familiar Generate documentation dialogue box pops up and displays progress as the code is generated:

You can now use the Open file link to display the generated file in your default editor. Here's the file I generated, displayed in the Delphi 11 IDE:

Notice that the source file is a Pascal unit, with an integer constant defined for each help topic. The numbers are the topics' Help Context numbers, which can be both seen and edited in the topics' context menus. The comments in the source code refer to the topic caption as displayed in the Table of contents pane:

Notice that the unit is named Unit2NS and consequently the file is named Unit2NS.pas. I will be renaming that since it clashes with my Delphi project's name. Then it's just a matter of adding the source file to the Delphi project and writing the code that uses it to access specific topics from within the program.
"Just a matter" eh? Well there's quite a lot of changes needed to Unit2NS to implement a help system and I'm not going into that here, mainly because I've not written it yet! Most Delphi coders will know how to do this though, so I'm leaving that as an exercise, which I believe is the usual cop out.
Keywords
In part one it was noted that the Index tab of generated HTML Help files was missing. Similarly, the Index tab of generated HTML web site was empty. The solution to this is to define some keywords.
We do this using the Add keyword button on the Home ribbon.

There's a little quirk here in that you must be displaying the Keywords tab in the right hand pane of the HelpNDoc window, otherwise clicking the Add keyword button displays the less-than-helpful Cannot focus a disabled or invisible window error message. It would be an improvement if the Add keyword button would select the Keywords tab if necessary, instead of displaying the error message.
If you drop down the Add keyword button's menu you can choose to add a keyword or a child keyword:

Alternatively, you can ignore the Add keyword button and use the context menu of the Keywords pane:

Firstly you have to name the keyword. This can be done when the keyword is created simply by typing its name in place:

You can also (re)name a keyword later, by right clicking it and using the Rename context menu option:

To be of any use, keywords must be associated with topics. I've found two ways to do this.
Firstly, if any topic is selected in the Table of contents pane then that topic will be associated automatically with new keywords. In the following image the Copyright & Licensing topic is selected and the new keyword just added is associated with it, as is indicated by the tick next to it.

If that's not what you want, simply un-tick the checkbox that appears next to the keyword.
To prevent this behaviour simply select the root topic - Unit2NS in my case - and then new keywords will not be associated with any topics.
In the above image you may also notice that the copyright and license keywords are ticked too. This means that they are also associated with the Copyright & Licensing topic. This suggests an alternative way to associate keywords with topics: select each topic in turn and tick whichever keywords you want to associate with the topic. Note that a keyword can be associated with more than one topic, and vice versa.
Now to the second method, which is to use the Manage keyword association dialogue box. This method works well when you want to associate a keyword with more than one topic. The dialogue box is accessed from a keyword's Associated topics context menu option:

Here you can choose one or more topics to associate with the selected keyword.
I found myself using both methods, depending on how I was thinking about the many-to-many relationship between keywords and topics.
OK, so we've created the keywords and associated them with topics, but what does that give us? Using the HTML Help (.chm) file as an example let's first remind ourselves what it looked like before adding keywords:

There is no Index tab present, just Contents, Search & Favourites, as was noted back in part one. Regenerating the file after adding keywords results in this:


The Index tab has appeared and lists the keywords, showing the parent-child relationships we set up in HelpNDoc. Double clicking a keyword with a single associated topic takes us straight to the topic, as in the top image above, while double clicking a keyword with multiple associated topics displays the familiar Topics Found dialogue box.
We get a similar result with the HTML web site - the previously empty Index tab now has content:

And that, as they say, is that!
Removing the default copyright message
ERRATUM: After publishing this post I discovered a major error in this section. Consequently the section was revised significantly on 2022-02-16.
By default HelpNDoc displays a copyright message at the bottom of each topic when generating multi-file document types, such as HTML and CHM. It gets the copyright information from the project properties. See part one for details of how to set those properties.
I didn't really want this line rendering in every topic because I use a special topic for copyright information that I find sufficient.
Switching off a project-wide option like this one is done in the Project options window, which is accessed by clicking the Project options button on the Home ribbon.
At first I thought that I simply had to change the Footer drop down on the Automated settings tab of the project options page from the default Display project copyright to Hide the footer and all would be good:

To my surprise here's what I got:

I must admit to being a bit baffled here - I really expected the message to be gone. After some faffing about I discovered that you can also customise the footer (and header) on a per topic basis. What's more I'd failed to notice that a topic inherits the current project wide-footer display options at the moment the topic is created. So, all the topics I had created before switching off the footer in the the project options still had the footer enabled. Topics I created after making the project wide change had the footer switched off. So I had to turn off the footer for each affected topic in turn.
To turn off the footer for a specific topic I right-clicked the topic in the Table of contents pane, chose the Topic footer option from the context menu then selected Hide the footer from the resulting sub-menu:

Re-rendering the document got me the result I wanted:

That was a little convoluted, but it seems to have worked.
I like the idea that you can override the project options on a per-topic basis, but I would prefer to have a Use project default option (switched on by default) that causes the topic to use the current project settings when rendered. That would make it much easier to change your mind later.
Next Time
That's all I've time for in this post, so I'll end with a reminder of what I'm planning to cover in the final post in this series:
- Using custom build tags
- Customising document output.
- Various topic properties not covered in parts 1 to 3.
Project Files
In previous posts I included the Unit2NS project files as a download. That's not possible this time because I neglected to take a copy before adding some content not covered in this post. But I the final version of the files are available with part four of this series.

Comments
Post a Comment
Comments are very welcome, but please be aware that I moderate all comments, so there will be a delay before your comment appears.
Advertising spam and the rare abusive, hateful or racist comments will be blocked and reported.
Finally, should you have a query about, or a bug report for, one of my programs or libraries please use the relevant issue tracker rather than posting a comment to report it.
Thanks