Focus On: HelpNDoc (part 1)
This is the second in a little mini series where I take a look at some applications that Delphi developers may find useful.
Developers please note that I'm happy to blog about other useful development software or libraries that may be useful to Delphi or other Pascal developers. Free of charge. Gratis. For full details see my "Promoting Delphi developers & applications?" blog post.
This time I'm focussing on HelpNDoc 7 by IBE Software. And this really is a long look! In fact there's so much to describe I've split this over more than one post. Here are links to the others:

For the sake of transparency I want to disclose that I received a free license for this product, for which I'm grateful.
Introduction
Given that HelpNDoc has a lot of features, a simple walk through would be way too long. So instead I decided to actually develop some documentation for my relatively new (and simple) Unit2NS program, from scratch, and let you follow along. I'll start from scratch and take quite a deep dive into what I needed to learn to do this.
The end result will be (hopefully):
- A help file accessible from the Unit2NS UI.
- An HTML5 web version of the help.
- A Markdown version of the documentation.
- A PDF document containing all the help.
As for time constraints, I'll be writing this in my spare time over a couple of weeks. And since I've never used HelpNDoc before, I'll be relying heavily on the documentation. I didn't look at the program's Facebook and Twitter pages because (a) I didn't have too much time and (b) I avoid Facebook like the plague unless forced!
Let's see how I get on.
Getting Started
After loading HelpNDoc I chose the File | New Project menu item to display the New Project... dialogue box.
There's the option of creating an empty project or providing an outline. Non US users will want to select a language here. As you may be able to guess by my spelling of "dialogue", I'm an English English speaker, so I selected English (United Kingdom) from the Project Language drop-down.
HelpNDoc suggests a default table of contents. Rather than adapt that I decided to replace the suggested contents with my own. I then gave the project its obvious title.
Clicking OK created the new project with the required table of contents:

Adding Content
Topics
Now it was time to do the hard work and enter the text into each topic. Each topic can be one of several different kinds:
- Normal topic
- Empty topic
- Show external URL
- Include external file
For my purposes I only needed the first two types.
- All the leaf nodes of the project tree, along with some of the higher level nodes are "Normal" topics, i.e. they contain text.
- Other higher level topics are simply there for organisational reasons and contain no text. Such nodes are flagged as "Empty" topics.
There are several ways to change the kind of a topic. One of the ways I found myself using is to right click the node in the Table of contents pane and select the Topic kind menu option and then the required kind from the sub menu, as in the following example:

You'll be relieved to know that I'm not going to show you each topic page as I type it. I'll just show one "Normal" and one "Empty" topic as examples. First, the "Overview" topic shows a typical "Normal" topic with some content entered:

Notice the pale yellow pane at the top. This tells you what kind of topic this is, gives some information about it, and provides a link you can use to change it. Note particularly that it tells us that the topic's title will be displayed as a header in the rendered document and that the copyright statement will appear in the footer. More about me forgetting about that footer in a later post!
Below the pale yellow pane is the content that I have entered. This shows the text as it appeared when I first typed it in, before I restyled it. I've created a numbered list and inserted some internal hyperlinks. Formatting and linking will be discussed below.
And here's what an Empty topic looks like. You can't enter any text here, because then it wouldn't be empty, would it? ;-)

Formatting Text
Text is formatted using the Write ribbon:

You can either format the text using the usual controls, like font name, size, bold etc., or you can use the Styles drop-down to apply a pre-defined style to the current paragraph or selected text, just like with Libre Office or Word. This is the approach I took because I wanted to be able to quickly restyle the document later, and the styles in the drop-down are both customisable and extendable.
Editing Text Styles
Until now, everything I wanted to do had been pretty intuitive and there had not been many times when I had to read the manual. But when I wanted to edit the text styles I got lost and had to hit the manual. Here I found that to edit styles you need to display the Styles window and to get to that you have press a tiny little button on the Styles section of the Write ribbon:

I was quite surprised that the window wasn't accessed from the Change Styles button that's just above the little button. If there's one suggestion for an improvement to the UI I'd make it would be to put an option to get to the Styles window on that menu. But hey, there may be another way to get there that I haven't found yet.
Anyhow, when I got to the window it seemed quite clear what I needed to change. It's very like how other word processors manage style editing.

I started off changing the default font and then worked through various other styles I wanted to change. This proved to be a very rapid way of changing the styling globally. Just changing the "Normal (Standard)" style, as in the image above, resulted in changes like the following. Impressive and a great productivity aid.

Most of the styling was done simply by redefining some existing styles, but I did end up creating one new style - mainly to learn how to do it! That new style was used where I wanted to created some boxed text, like this:

To do that I displayed the illusive Style dialogue box again, then selected the Normal (Standard) style, clicked the Add button and chose Add Custom Style from the drop down. Then it was just a matter of giving the style a new name and customising the style using the Description and preview pane:

Of course you can base your new style on any of the existing styles.
Creating Hyperlinks
As you'd expect, it's possible to added hyperlinks to the document. You can insert both internal document links and external links to URLs out on the web.
Both types of links are entered using the Edit Hyperlink dialogue box. You can access this by highlighting the desired link text, right clicking and selecting the Hyperlink option from the resulting popup menu.

You select the type of link you want in the Link to panel in the dialogue box. Here I'm inserting a link to a topic in the document and have chosen the "The slow way" topic as the destination. Click OK and the selected text is styled as a link and will link to the desired topic when the documentation is generated.
Inserting Images
Although I didn't illustrate this in the sample topic above, HelpNDoc supports embedding images in your project. All the usual formats are supported - including animated GIFs.
Inserting images couldn't be much simpler (which is good because I used quite a lot of them), but there's something to keep in mind, and that's HelpNDocs' Library system. When you add an image it is automatically recorded in the library. This is useful if you need to re-use an image in the document. You simply choose the image from the library rather than loading it again from file.
Here's how I added an image to the "Switch Mappings" help topic. I placed the cursor where I wanted the image. Next I clicked the Insert picture button on the Insert ribbon. Since the image I was adding had never been added before, I selected the Insert another picture option from the drop down menu:

This produces a dialogue box that is used to insert the image. There are several options under the Customize item pane. I chose to include the file in the project archive (spoiler: later I changed my mind). Clicking the Include file button displays a standard file selection dialogue box from where I chose the required file.
 Inserting an image (2): Embedding an image in the project
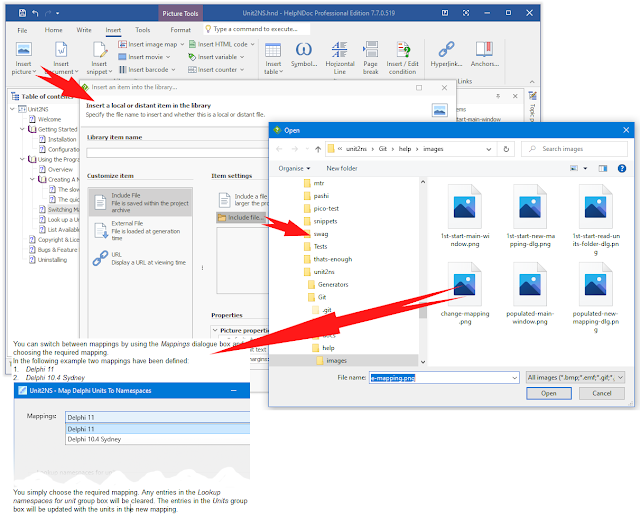
There is also the option of leaving the files as separate files in an external location, which is what I later decided to do. I placed all the required images an images sub-folder of the directory where the HelpNDoc project file is stored, then used the External File option in the Customize item list in the Insert an item into the library dialogue box:

Here I elected to specify the file name as relative to the project file, which makes sense for me given that my images are all in the aforementioned sub-directory. This makes things much easier if I ever move the project to a new directory.
The image now appears in the Library pane (with a different icon depending on whether the file is embedded or external):

I later discovered a useful shortcut for this: you can select one or more files in Windows Explorer and drag and drop them over the Library pane. That results in the following dialogue box:

Clicking OK installs the files in the library ready for later use. Then it's just a matter of dragging the required image from the library to a topic wherever you need it.
Trouble is, this method includes the file in the project archive by default (which I didn't want). Then I noticed that items in the Source column of the Library item import dialogue box could be dropped down and the Include file in project option could be replaced with Link to external file. Brilliant - exactly what I wanted.

When linking to external files you might want to tick the Set external files' paths as relative to the project path check box. If I'd noticed that earlier it would have saved me a lot of tweaking later!
By the way, if you need to change an image file name from absolute to relative you can do it by right clicking the image in the Library then choosing the Item properties menu option and editing the path in the resulting dialogue box. I ended up doing that - a lot!

Using Variables
I needed to store the project's copyright date in the "Copyright" topic page. Of course I'm almost guaranteed to forget to come back each subsequent January to update it.
Never mind, I discovered HelpNDoc's "variables" that can automatically enter text into your project that varies depending on certain conditions. And there was one variable that enters the current year. Perfect. This is the Year - long variable.
This variable was entered by finding it in the Library pane and drag/dropping it into the text where it's needed:

As can be seen, the variable name appears in the text. The variable is only replaced by the appropriate value once the document is rendered:

There are lots more pre-defined variables. Check the Library pane for details. And you can define your own - maybe I'll cover this in another post.
Creating Additional Topics
Naturally enough I didn't get the project outline right the first time, so needed to add new topics. Luckily this is easy. The method I used was to right click an existing topic in the Table of contents pane, select the Add topic menu option and then choose where to place the topic relative to the selected one. The topic is given a default name of New Topic which can be edited in place. Finally the topic can be dragged to a new position if required. See the following image for details of the workflow I used:

Generating The Help File(s)
Having got all the content created it was at long last time to generate some output. This was done from the Home section of the ribbon using the Generate help button.
If you click the main part of the button you can create a whole series of documents in different formats, all from the same source, using the Generate document dialogue box.

Selecting each item in the Build list in turn lets you customise the output. You select which document types you want by ticking the different types in the list. When you are ready just click Generate and wait a short while until the documents have been compiled.
There's a second method you can use if you want to just generate a single document type at a time, and that's to click the lower part of the Generate help button and select the required type from the resulting drop down list:

Note that there are two sections here: Quick generate that lets you quickly generate (duh!) one type of document; and the Code generation section that lets you generate source code in various languages to help you link to help docs from your programs. We'll be covering that in part three.
I decided to batch generate CHM, HTML and PDF documentation, accepting all defaults:

This led to the following dialogue box being displayed, in which output from the various document compilers was displayed. At the bottom of the dialogue box are links that can be used to display the generated documents:

Notice that there is a built in web server that can be used to serve generated HTML documents. I clicked the CHM & PDF Open file links and the HTML document Launch web server links. Here's a montage of each of the documents that were displayed, all displaying the same topic:

The PDF document is one long linear document, with a tree of topics is available in the left hand panel. The compiler has inserted headings for each topic. I don't like the styling of those headings and will be looking into how to change that.
The HTML document is displayed in my default web browser. It has one HTML page for each topic along with a tree of clickable topics on the left. You'll notice that there are Index and Search tabs in addition to the default Contents tab. The Index tab has no contents in this build. We'll come back to that in part three. The Search tab can be used to find text in the document.
The CHM document is displayed in the Windows HTML help browser. As you'd expect there is a page for each topic. The Contents tab displays the, err, contents, as a tree of topics. The Search tab has no content, just like the HTML document - again you'll need to wait for another post to deal with that. [edit]The window has no Index tab, for the same reason that the HTML document's Index tab is empty. Again that's covered in part three.[/edit] And the Favourites tab (yay - UK spelling for a change) is empty until you add something!
Now, at the start I said I wanted to created a Markdown document but haven't included one here. That's because, although it is possible to create a document in this format, I wanted to change how it's presented. That'll have to wait for part two.
But what's this business with the text "Copyright © <Dates> by <Authors>. All Rights Reserved." that appears at the bottom of the pages in each HTML and CHM topic page? Remember that we saw that HelpNDoc inserts copyright text at the bottom of topic pages by default? I simply forgot to type in some appropriate text for it display! We do that in the Project settings. Let's fix that now:

Eventually I managed get rid of the copyright message entirely. Find out how in part three.
Impressions So Far
This is not really a review, more a guided tour of my use of the program, but I do have a few observations to date.
You can jump in and get some work done without learning the program in too much depth and get something useful out of it. I found the defaults to be well chosen in the main. I wasn't keen on the default text style, but that was really easy to change, once I'd found the Styles dialogue!
But, if you are prepared to spend some time learning the program, I think it will reward you. I have only scratched the surface so far. I guess the developers may be thinking "there's a much easier way to do that" about some of the things I've done, but I thought it would be useful to describe my exploration of the program, including the mis-steps I made along the way.
So far, I like HelpNDoc and will definitely be using it it anger. I'm very attracted to its "single source for multiple outputs" approach.
What's Next?
That's enough for this post - it's already amongst the longest I've ever written. But we've nowhere near covered everything that HelpNDoc can do for me. In later posts I'll take a deeper dive into some of the more advanced features.
Here's what's still to cover:
- Scripting
- Conditional content.
- Source code generation.
- Keywords.
- Inhibiting the Copyright message in help topics.
- Custom
variablesbuild tags. - Customising document output.
- Various topic properties not covered yet.
Until then, stay safe & happy coding.
Note: Part 2 covers items 1 and 2, Part 3 covers items 3 to 5 and Part 4 covers the remainder.
Project Files
If you want to see the project as it was at the end of writing this blog post I've uploaded it, warts and all, to my Google Drive account.

Comments
Post a Comment
Comments are very welcome, but please be aware that I moderate all comments, so there will be a delay before your comment appears.
Advertising spam and the rare abusive, hateful or racist comments will be blocked and reported.
Finally, should you have a query about, or a bug report for, one of my programs or libraries please use the relevant issue tracker rather than posting a comment to report it.
Thanks