Focus On: HelpNDoc (part 4)
This is the fourth and final post in a series of blog posts about my experience of using HelpNDoc in a real life project to produce documentation for my Unit2NS program. In this post we're going to mop up all the subjects that were outstanding after the first three parts:
- An introduction to HelpNDoc
- Starting a new project
- Adding content, including:
- Adding & editing topics
- Formatting text & using styles
- Creating hyperlinks
- Inserting images
- Using variables
- Generating help documentation
- Customising document output using HelpNDoc scripts
- Conditionally including content depending on the type of document.
- Source code generation.
- Keywords.
- Inhibiting the Copyright message in help topics.
- Custom build tags
- Customising document output.
- Various topic properties not covered in parts 1 to 3.
Please note that there have been a couple of updates to HelpNDoc since I started this series, but I have stayed with v7.7.0.519 throughout for consistency.
Custom build tags
In part two we looked at how to conditionally include content in a help document by using one of HelpNDoc's built in build tags. Here we'll take a look at how to create custom build tags and give an example of how to use them.
How to go about creating a build tag is a little convoluted. First, select any topic and right click it to display the topic's context menu. Select the Include in builds option, then the Manage build tags option on the resulting sub-menu. This displays the Manage build tags dialogue box. Add each tag by entering it in the Add a tag box and clicking the Add button:

These tags can now be used to control conditional content, just like the built in tags. HelpNDoc's docs have a good example of how to use this feature to vary content for different versions of the your software, so I'm not going into that here. What's more, the process is similar to how to use built-in build tags. I covered that for the built-in pdf build tag in the Conditional Content section of part two.
What I will do is to show how to use a custom build tag to conditionally show or hide an entire topic, which is something I've not described before. I must confess that this example is a little contrived and, unlike the other examples, I won't be keeping it in the final project.
Let's assume we want to include a Change Log topic, but only for versions after the initial release. (After all the change log is pretty empty at the initial release.) We'll manage this using a new later-version custom build tag, which we create as described above.
First, let's create the new topic (see part one for details of how to do this):

Now we need to tell HelpNDoc to include this topic only when the later-version custom build tag is defined. To do this right click the Change Log topic, select Include in builds from the pop-up menu then select the later-version custom tag.

OK, but how do we specify whether this tag is defined or not? To do this we need to create a separate build item for each documentation type we are using in our project. For this we need our old friend the Generate documentation dialogue box. Display it by clicking the Generate help button on the Home ribbon.
In this example I'm going to set this up for HTML documentation only, but the same process needs to be carried out for each of the other document types used in the project. First we need to create a new HTML item on the build list. In the Generate documentation dialogue box click the green Add button and choose HTML documentation. Now we right click the resulting new item, select Rename and name it Build html documentation (1st release):

Now we select the original Build html documentation build item and rename it as Build html documentation (later releases). While this build item is still selected we choose the Conditional generation tab in the Build settings pane and tick the later-version tag's check box in the Included tags list:

Now we select the Build html documentation (1st release) build item and ensure the later-version tag is not ticked. It shouldn't be, but it's worth checking:

Note that in the above screen shot I've moved the Build html documentation (1st release) item up under the other HTML item by using the blue up arrow button.
Finally, it's time to test the output. Redisplay the Generate documentation dialogue box. Now tick the boxes next to both the Build html documentation (xxx) build items and clear all the others. Click the Generate button. The output will be something like the following:

Clicking the first Launch web server link will display the version of the documentation with the later-version build tag defined. Closing the web server then clicking the other Launch web server link will display the version without later-version defined. Here's what I saw:
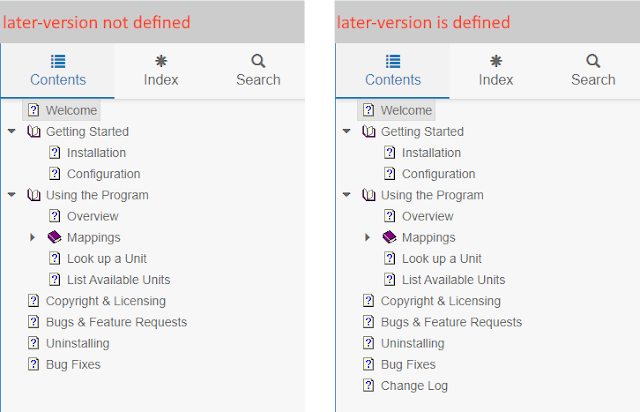
That's what we wanted: the Change Log topic is only defined when the later-version build tag is defined.
Note: If you get a "Output directory is not empty" warning when generating the documentation you may need to delete HelpNDoc's output folders. By default they are in the %USERPROFILE%\Documents\HelpNDoc\Output directory.
Customising document output
In part one I mentioned I didn't like the style of the default topic headings in the generated PDF files. I wasn't keen on the title font and colour and wanted to change them. We'll see how to customise that here.
Just like when we modified the Markdown document output in the Scripting section of part two, we need to modify the template used for PDF documents. So we start by displaying the Generate documentation dialogue box from the Generate help button on the Home ribbon. We must duplicate the Default PDF Template in order to be able to modify it. If you don't yet know how to do this please refer back to part two where I cover the process in detail - the only difference is this time we're operating on the PDF document type instead of Markdown.
Staying in the Generate documentation dialogue box, select the newly created template: I've called this Unit2NSPDF. Now click the Edit link to display the Edit template dialogue box and then select the Topic titles item in the Edit template... pane. Now click a title level in the Topic titles pane to display the Text layout dialogue box. Changes to the selected title's style are made here:

Repeat the process for each title level you want to change.
I changed the font to Palatino Linotype, the colour to #6B6B6B and bumped the font sizes up a bit. I only changed the font of the first four heading styles, because I am only using those. Here's a look at the results showing title levels 1 & 2 in the resulting PDF document:

Of course, this is only scratching the surface - there's a lot more that you can restyle than this. Either experiment away or read the HelpNDoc docs to learn more.
Topic properties
There are several topic properties that either haven't been discussed yet, or I've got a little more to say about them.
To refresh your memory, you get to topic properties either by right clicking the required topic in the Table of contents pane or by selecting the topic and clicking the Topic properties button on the Home ribbon:

In addition you can see a few topic properties in the Topic properties pane, along with some document specific and custom properties:

Because I've no experience in using the document specific or custom properties I won't cover them here - I'm just sticking to pre-defined ("System") properties.
Help ID, Help Context & Description Properties
The Help Id, Help Context and Description properties can be edited in place, either in the menus or in the Topic properties pane. While I have shown an example of entering a Description in the Topic properties pane, I won't discuss it further here. That's because I have had no cause to use the Description property in my project so far.
I decided to modify the Help Id properties to ensure they appear in Pascal case. For example, the Look up a Unit topic is given the Help ID of "LookupaUnit" by default, but I prefer "LookUpAUnit". This is so the exported Pascal source code (see part three), which uses the Help Id property as part of the generated constant name, appears in the accepted Pascal coding style:
const
  HELP_LookUpAUnit = 303; // Topic: "Look up a Unit"
I also changed the Help context value (which is used for help context numbers in CHM files) so the numbers reflect the hierarchy.
Once all the changes to Help Id and Help Context were made, the properties had the following values:

Header & Footer Properties
These two properties work in a similar way in that they can be used to override related global project settings on the Automated settings tab of the project options page. As I observed in the Removing the default copyright message section of part three, any changes made on the Automated settings tab only apply to new topics created after a global setting is changed.
Both properties have similar options:
- To display some pre-defined text:
- Header displays the the topic title
- Footer displays the copyright message per the Project settings tab of the project options page.
- To hide the header or footer
- To display some custom text
You can change these properties by right clicking a topic and then choosing either the Topic header or Topic footer options from the context menu. Each of those options displays a sub-menu where you can choose the required option, or in the case of the Display custom text option, enter the required text:

There's another way to do this, and that's from the yellow pane at the top of the topic editor pane. There is text describing how the header and footer will display. Either of those pieces of text can be clicked to change the associated topic property:

Changing Header property from topic editor (Footer is similar)
Using the Header property as an example, the following image shows how the same topic is rendered for each for the three possible header options (Left: Display topic title, Middle: Hide the header and Left: Display custom text):

Although these examples are for the Header property, the Footer property displays similarly. (A practical example of using Footer is covered in the Removing the default copyright message section of part three.)
Icon Property
The icon associated with any topic can be changed. Just display the now-customary context menu for the topic and choose the Topic icon option. This displays a selection of icons you can choose from. Here I'm changing the icon for the Copyright & Licensing topic from the default question mark to an exclamation mark:

Here's the result in a rendered HTML web page:

As with the Footer and Header properties the default icons used for each of the four topic kinds can be set on the Automated settings tab of the project options page.
Status Property
The Status property provides a means of tracking progress with our documentation. There are four possible values for this property: Complete, Needs Review, In Progress and Out Of Date. Once again the default for new topics can be set in project options. This time we use the Topic status option on the topic's context menu and select the required value of Status from the sub-menu that is displayed:

You can choose to render pages only with certain Status values. You can also create your own status values. I'm not going into this any further because I haven't needed to use this property in Unit2NS, so my knowledge is limited. For more details see the HelpNDoc documentation.
Visibility Property
The only other property on the topic context menu I've not discussed here, or in an earlier post, is the Visibility property. The property has three possible values: Visible, Hidden in table of contents and Hidden.
So far I've not used this property, so I don't feel confident to say more about it here.
However, in the final HelpNDoc project I may want to hide some topics that are to be accessed from the program's context sensitive help that I don't want to appear in the TOC. If I end up doing that, I may publish an additional post about how I got on.
And Finally...
It's been a long haul, but we've finally got to the end of this multipart "Focus On: HelpNDoc" series†.
My plan was to write about my experience of using HelpNDoc to create help documentation for my Unit2NS program, and I've now exhausted everything I've learned so far. Will my actual help documentation be exactly as we've left things? No, but it will probably be close. There are things I would like to improve and correct before I publish the docs. And Unit2NS is due to change a bit with the next release, so I'll need to update the docs accordingly.
I hope you've enjoyed the series. All the errors are mine, and there are probably easier ways to achieve what I've done. But this was supposed to be a journey of discovery more than a review or fully fledged tutorial.
One last time, here are links to the other parts of this series:
† Although the series has ended I may blog about it if I discover anything of interest as I complete the Unit2NS documentation.
Project Files
In part three I promised I'd make the project files available at the end of this post. Here they are:
Those files reflect the state of play at the end of this blog series. Any further changes I make will eventually appear in the Unit2NS GitHub repository.

Comments
Post a Comment
Comments are very welcome, but please be aware that I moderate all comments, so there will be a delay before your comment appears.
Advertising spam and the rare abusive, hateful or racist comments will be blocked and reported.
Finally, should you have a query about, or a bug report for, one of my programs or libraries please use the relevant issue tracker rather than posting a comment to report it.
Thanks